Roll your own Continuous Integration System (C.I.S.)
Content:
Configuracion de MySQL
This is a very short post, and the reason is that this is more like a remainder that the default installation cannot be used for production environments without changing default database manager (Derby) for any other. My choice is MySQL + filesystem.
Artifactory guys explained it perfectly in their wiki, just take a look, it is easy and I have just tested it, no problem.
http://wiki.jfrog.org/confluence/display/RTF/Running+Artifactory+on+MySQL
It is supposed that you have just installed it from the WAR, stop Tomcat, erase from your artifactory_home everything but "etc", it is the only folder you will need for the derby->anyother change.
Now follow the steps, if you did them alright, you will find the erased folders re-created again, and the following command will show you that some tables were created in the MySQL database: mysqlshow -u root -p artifactory .
Now continue tunning a bit this software in the next entry.
Mostrando entradas con la etiqueta configuration. Mostrar todas las entradas
Mostrando entradas con la etiqueta configuration. Mostrar todas las entradas
miércoles, 10 de agosto de 2011

domingo, 10 de abril de 2011
Roll your own Continuous Integration System (C.I.S.): Artifactory installation, Linux, MySQL and Tomcat 6.x
Roll your own Continuous Integration System (C.I.S.)
Content:
War installation
There are numerous well-formed tutorials about how to install Artifactory as the chosen Maven Dependencies Repository of our Continuous Integration System.
I will summarize their steps as concisely as possible:
A trip to a default configured Artifactory
Some default features:
- It supports Maven, Ivy and Gradle systems. We will only use Maven here.
- Artifactory provide several remote dependency repositories, and it will act as a proxy downloading and storing from those repositories for you.
- A dead-simple security schema. It is possible only for admins to upload files. User:admin, Pass: password. Shhh, it's a secret ;)
- Search engine for classes, packages and other files.
Welcome Page:


As said before, Artifactory can serve to Maven, Gradle and Ivy.
See the Home tab -> Left menu -> Client settings -> Maven Settings. (You are allowed to nose around Ivy and Gradle, but don't tell me :P )
Next, you have some sections to declare and put in your settings.xml configuration file. It's a bit early for this, don't worry, only keep it in mind.
Artifacts:

Some layouts to improve your feeling in searches (What the fuck, so much time reading Microsoft marketing), mainly they are offered to you both tree and list structure.
The tree layout is created through the groupId + artifactId, being the default repositories the roots of the trees, one for each repository.
Notice that if you click over a repository, you will get a Maven snippet for your pom.xml, for example:
<distributionManagement>
<repository>
<id>linux-wdx0</id>
<name>linux-wdx0-releases</name>
<url>http://localhost:8080/artifactory/libs-3rd-party</url>
</repository>
</distributionManagement>
If you paste the snippet in your pom.xml (remember, only one distributionManagement per pom.xml, so, if you already have one, you will have to merge them), you will be able to upload (if you are authorized, of course) generated artifacts to that repository with "mvn deploy" in deploy phase.
Default repositories in Artifactory:
libs-release-local: Your libraries and products go here, only releases.
libs-snapshots-local: Your libraries and products go here, snapshots.
plugins-release-local: Your plugins, or plugins needed by you, releases, here.
plugins-snapshots-local: Your plugins, or plugins needed by you, releases, here.
ext-releases-local: 3rd party libraries, releases, needed by your projects. (i.e. Spring, ojdbc driver.. )
ext-snapshot-local: 3rd party libraries, snapshots, needed by your projects.
Artifact resolution in Artifactory:
I do not like to simply repeat what is already written and it is not improvable by me:
http://wiki.jfrog.org/confluence/display/RTF/Understanding+Repositories
Here finishes first chapter about Artifactory. Coming soon: Simple security and customization of repositories.
Content:
War installation
There are numerous well-formed tutorials about how to install Artifactory as the chosen Maven Dependencies Repository of our Continuous Integration System.
I will summarize their steps as concisely as possible:
- Create a directory with owner tomcat.tomcat (user/group) where Artifactory is meant to put all its information and artifacts. Let's say... /var/artifactory
- Edit /usr/share/tomcat6/conf/tomcat6.conf and add the variable anywhere in the file. I prefer at top. ARTIFACTORY_HOME="/var/artifactory"
- Download last version of OSS Artifactory (Or pay the license if you find it worthy, of course).
- Unzip and install artifactory.war into your Tomcat6, remember how?
- you may copy artifactory.war into /usr/share/tomcat6/webapps/ if you have direct control over the filesystem, or
- you may use the Manager (/manager/html) application if you installed it previously
- Once artifactory is copied, automatically is run, and you should see in your ARTIFACTORY_HOME how some directories have appeared. Now you have a secureless, derby-managed Artifactory installation not ready for production, but perfect for testing.
A trip to a default configured Artifactory
Some default features:
- It supports Maven, Ivy and Gradle systems. We will only use Maven here.
- Artifactory provide several remote dependency repositories, and it will act as a proxy downloading and storing from those repositories for you.
- A dead-simple security schema. It is possible only for admins to upload files. User:admin, Pass: password. Shhh, it's a secret ;)
- Search engine for classes, packages and other files.
Welcome Page:

Do you need more explanations?
Maven settings:

See the Home tab -> Left menu -> Client settings -> Maven Settings. (You are allowed to nose around Ivy and Gradle, but don't tell me :P )
Next, you have some sections to declare and put in your settings.xml configuration file. It's a bit early for this, don't worry, only keep it in mind.
Artifacts:

Some layouts to improve your feeling in searches (What the fuck, so much time reading Microsoft marketing), mainly they are offered to you both tree and list structure.
The tree layout is created through the groupId + artifactId, being the default repositories the roots of the trees, one for each repository.
Notice that if you click over a repository, you will get a Maven snippet for your pom.xml, for example:
<distributionManagement>
<repository>
<id>linux-wdx0</id>
<name>linux-wdx0-releases</name>
<url>http://localhost:8080/artifactory/libs-3rd-party</url>
</repository>
</distributionManagement>
If you paste the snippet in your pom.xml (remember, only one distributionManagement per pom.xml, so, if you already have one, you will have to merge them), you will be able to upload (if you are authorized, of course) generated artifacts to that repository with "mvn deploy" in deploy phase.
Default repositories in Artifactory:
libs-release-local: Your libraries and products go here, only releases.
libs-snapshots-local: Your libraries and products go here, snapshots.
plugins-release-local: Your plugins, or plugins needed by you, releases, here.
plugins-snapshots-local: Your plugins, or plugins needed by you, releases, here.
ext-releases-local: 3rd party libraries, releases, needed by your projects. (i.e. Spring, ojdbc driver.. )
ext-snapshot-local: 3rd party libraries, snapshots, needed by your projects.
Artifact resolution in Artifactory:
I do not like to simply repeat what is already written and it is not improvable by me:
http://wiki.jfrog.org/confluence/display/RTF/Understanding+Repositories
Here finishes first chapter about Artifactory. Coming soon: Simple security and customization of repositories.
domingo, 20 de febrero de 2011
Roll your own Continuous Integration System (C.I.S.): Basic Tomcat configuration - Basic application manager and user permissions
Roll your own Continuous Integration System (C.I.S.)
Content:
Our tomcat installation provided an application manager, with all basic function to administrate the life cycle of our applications.
Top advantages:
1) No need to leave applications in a folder to deploy them, this application will copy there for us.
2) Manage start, stop, redeploy and undeploy of every application comfortably.
3) Secured, only users with "manager" or "manager" role can reach this application.
4) Web and REST interface.
As said in the third point, this application is secured, using basic tomcat configuration. Take a look to your conf/tomcat-users.xml, read the useful comments inside <tomcat-users> tags:
<!--
NOTE: By default, no user is included in the "manager" role required
to operate the "/manager" web application. If you wish to use this app,
you must define such a user - the username and password are arbitrary.
-->
<!--
NOTE: The sample user and role entries below are wrapped in a comment
and thus are ignored when reading this file. Do not forget to remove
<!.. ..> that surrounds them.
-->
Now uncomment the next block of xml user declarations, although I rather keeping only one line like this:
<user username="tomcat" password="tomcat" roles="manager"/>
and I usually erase the others, in order to keep it clean.
Once done this, restart the server (service tomcat6 restart) and try to enter to your server:port/manager/html (usually localhost:8080/manager/html). type your user and password for a manager user (in my example, "tomcat" and "tomcat") and discover one of the most useful tools in tomcat administration.

The first half of the page is devoted to list your application and their status.

Scroll down a bit, you will find two ways to deploy an application, by local address in tomcat's computer, or by uploading a war file from your computer, that might not be always the same.
Now you are ready to deploy easily all the applications for your Continuous Integration System :)
pd: A stopped application will start if Tomcat is rebooted. That is important and not very intuitive.
Content:
Our tomcat installation provided an application manager, with all basic function to administrate the life cycle of our applications.
Top advantages:
1) No need to leave applications in a folder to deploy them, this application will copy there for us.
2) Manage start, stop, redeploy and undeploy of every application comfortably.
3) Secured, only users with "manager" or "manager" role can reach this application.
4) Web and REST interface.
As said in the third point, this application is secured, using basic tomcat configuration. Take a look to your conf/tomcat-users.xml, read the useful comments inside <tomcat-users> tags:
<!--
NOTE: By default, no user is included in the "manager" role required
to operate the "/manager" web application. If you wish to use this app,
you must define such a user - the username and password are arbitrary.
-->
<!--
NOTE: The sample user and role entries below are wrapped in a comment
and thus are ignored when reading this file. Do not forget to remove
<!.. ..> that surrounds them.
-->
Now uncomment the next block of xml user declarations, although I rather keeping only one line like this:
<user username="tomcat" password="tomcat" roles="manager"/>
and I usually erase the others, in order to keep it clean.
Once done this, restart the server (service tomcat6 restart) and try to enter to your server:port/manager/html (usually localhost:8080/manager/html). type your user and password for a manager user (in my example, "tomcat" and "tomcat") and discover one of the most useful tools in tomcat administration.

The first half of the page is devoted to list your application and their status.

Scroll down a bit, you will find two ways to deploy an application, by local address in tomcat's computer, or by uploading a war file from your computer, that might not be always the same.
Now you are ready to deploy easily all the applications for your Continuous Integration System :)
pd: A stopped application will start if Tomcat is rebooted. That is important and not very intuitive.
viernes, 18 de febrero de 2011
Roll your own Continuous Integration System (C.I.S.): Basic Tomcat configuration - JMX
Roll your own Continuous Integration System (C.I.S.)
Content:


About the content of jmxremote.password, a simply plain text with pairs of name password like this:
monitorRole tomcat
controlRole tomcat
About the content of jmxremote.access, a simply plain text with pairs of name policy like this:
monitorRole readonly
controlRole readwrite
Now you are able to see Tomcat with codename Catalina in your JConsole panel if you are running it locally, or throw remote connection.
Sorry for the delay, it really got me on my nerves to find the way of populating the jmx service!
Some help for Windows:
http://www.askproductions.no/blogg/2009/02/add-jmx-support-to-tomcat-6-on-windows/
Content:
I continue with this tutorial, this time I will assume you are working with Linux, in order to simplify the installation and configuration explanations. I do not have any license of Windows (no, Verbatim is not a Windows licenser).
JMX is one of those fabulous tools+protocol that almost anybody knows and everybody should know.
JMX is one of those fabulous tools+protocol that almost anybody knows and everybody should know.
It will help you to monitor any application since Java 1.5, it is based on reflexive calls and that guaranties uniform calling to unknown classes.
"The Java Management Extensions (JMX) API is a standard API for management and monitoring of resources such as applications, devices, services, and the Java virtual machine. The JMX technology was developed through the Java Community Process (JCP) as Java Specification Request (JSR) 3, Java Management Extensions, and JSR 160, JMX Remote API.
Typical uses of the JMX technology include:
Consulting and changing application configuration
Accumulating statistics about application behavior and making them available
Notifying of state changes and erroneous conditions.
The JMX API includes remote access, so a remote management program can interact with a running application for these purposes."
(from here.)
There's an easy-to-use tool for newbies called JConsole (jconsole.exe in Windows or jconsole in Linux), it is brought by JDK >1.5, you will find it in the same folder than java.exe or javac.exe. Find it, execute it, right now, do not wait one more minute.

The first you discover is the connection panel, first half for local applications, second half for remote ones. Local connections will never be empty due to the JConsole application itself is JMX-monitorizable. A monitorizable monitor!! Yehaaa!!!

Close to a dream, data, data, dataaaaaaaa :)
All about JConsole, it shows cpu consumption, memory usage, vm parameters, and MBeans...

MBeans are some special entities in java allowed to be exported like statistics and methods to be run. Indeed, cpu and memory statistic data are extracted from some well-known MBeans, and JConsole takes advance of knowing those MBeans for plotting some graphs. But it could could any metric you define.
Some day, in near future, I will describe how to populate application metrics and methods for being executed from JConsole or your own JMX protocol consumer.
Do not be shy, press that button, you will provoke a Garbage Collector call, and some memory will be freed. Change to memory tab to confirm it.
Summarizing, I find it quite important to monitor our Tomcat server in order to see memory consumption, CPU, and our application exported beans.
How to get it? It is not difficult.
http://tomcat.apache.org/tomcat-6.0-doc/monitoring.html#Enabling_JMX_Remote
It has taught me longer than expected to make it run, and the cause is that a line is missing for empty Tomcat6 installation.
The final configuration for Tomcat6 JMX enabled and simply secured is:
It has taught me longer than expected to make it run, and the cause is that a line is missing for empty Tomcat6 installation.
The final configuration for Tomcat6 JMX enabled and simply secured is:
# You can pass some parameters to java here if you wish toJAVA_OPTS="$JAVA_OPTS -Djava.awt.headless=true -Dfile.encoding=UTF-8 -Xms1536m -Xmx1536m -XX:NewSize=256m -XX:MaxNewSize=256m -XX:PermSize=256m -XX:MaxPermSize=256m -XX:+DisableExplicitGC"
# Enabling JMX CATALINA_OPTS="$CATALINA_OPTS -Dcom.sun.management.jmxremote.port=8091 -Dcom.sun.management.jmxremote.password.file=$CATALINA_BASE/conf/jmxremote.password -Dcom.sun.management.jmxremote.access.file=$CATALINA_BASE/conf/jmxremote.access -Dcom.sun.management.jmxremote.ssl=false -Djava.rmi.server.hostname=192.168.1.106"
About the content of jmxremote.password, a simply plain text with pairs of name password like this:
monitorRole tomcat
controlRole tomcat
About the content of jmxremote.access, a simply plain text with pairs of name policy like this:
monitorRole readonly
controlRole readwrite
Note some changes:
1) JAVA_OPTS is redefined with $JAVA_OPTS, in order to preserve some possible variable preset. The same for CATALINA_OPTS.
2) -Djava.rmi.server.hostname is defined in CATALINA_OPTS, with the server address. If not present, JMX module will only handle local calls, even though you set com.sun.management.jmxremote.port.
3) "com.sun.management.jmxremote" is not needed if "com.sun.management.jmxremote.port is defined."
4) Every variable set in a single line.
5) jmxremote.password and jmxremote.access should be only readable (and only readable) by tomcat user.
Of course, you can apply these instructions to the tomcat6.conf file in Linux, or Start->All programs->Apache Tomcat 6.0->Configure Tomcat. "Java" tab, for Windows, as we did before for memory configuration.
1) JAVA_OPTS is redefined with $JAVA_OPTS, in order to preserve some possible variable preset. The same for CATALINA_OPTS.
2) -Djava.rmi.server.hostname is defined in CATALINA_OPTS, with the server address. If not present, JMX module will only handle local calls, even though you set com.sun.management.jmxremote.port.
3) "com.sun.management.jmxremote" is not needed if "com.sun.management.jmxremote.port is defined."
4) Every variable set in a single line.
5) jmxremote.password and jmxremote.access should be only readable (and only readable) by tomcat user.
Of course, you can apply these instructions to the tomcat6.conf file in Linux, or Start->All programs->Apache Tomcat 6.0->Configure Tomcat. "Java" tab, for Windows, as we did before for memory configuration.
Remember, open Firewall for your JMX port if necessary!
Now you are able to see Tomcat with codename Catalina in your JConsole panel if you are running it locally, or throw remote connection.
Sorry for the delay, it really got me on my nerves to find the way of populating the jmx service!
Some help for Windows:
http://www.askproductions.no/blogg/2009/02/add-jmx-support-to-tomcat-6-on-windows/
martes, 11 de enero de 2011
CheckStyle configuration distribution
Content:
As we could see in previous posts, it is necessary to broadcast the same style for the same team, organization or project. But I only got the lower case "q" for my post due to I make you, the newbie in the company, to configure the CheckStyle XML in your IDE, for your workspace only.
Using this strategy, a 20 members team have to configure the same 20 times for every workspace, and the number of times a workspace should be changed is undetermined, but I have done it several times this month, and today is 10th of January and I did not work seriously until yesterday :S.
It no longer matter the number of times you change your workspace in your Eclipse IDE, it is simply a bad practice to charge with that duty to your team. It should be done the lesser times possible, the lesser people doing it possible, and the lesser complicated to update possible.
What I am explaining you today is the possibility of configuring CheckStyle at project scope, not IDE scope, sharing the same configuration to all your team with the same commit and, even better, referencing an external file instead a local one, making updates of style immediate for every mate without even knowing.
Erase your previous configuration:
Window Menu ->Preferences -> CheckStyle. Then select your previous home-brew configuration and Remove it.
Now configure your project:
Right click over your project, Properties -> CheckStyle -> Local Check Configurations Tab -> New.
Type: Remote Configuration
Name: Whatever, yes, there's room for creativity today.
Location: URI of the CheckStyle configuration. It would be as perfect as necessary to have the file shared in a ftp server, svn server or any other easy-access way. We settled it under svn control and access it through svn+http apache mod.
Save and close.
And voila, now all your team has to do is update the project and run CheckStyle for that project, automatically the project configuration will be token and only one person had to work for a team benefit.
This is not a perfect way of doing the distribution, but it is rather better than previous, at IDE workspace files. But this configuration seems to me to much IDE-dependant either, I am searching for a better CheckStyle configuration in the Maven descriptor file. I will tell you as soon as I really see it working.
See you.
Alberto Navarro.
As we could see in previous posts, it is necessary to broadcast the same style for the same team, organization or project. But I only got the lower case "q" for my post due to I make you, the newbie in the company, to configure the CheckStyle XML in your IDE, for your workspace only.
Using this strategy, a 20 members team have to configure the same 20 times for every workspace, and the number of times a workspace should be changed is undetermined, but I have done it several times this month, and today is 10th of January and I did not work seriously until yesterday :S.
It no longer matter the number of times you change your workspace in your Eclipse IDE, it is simply a bad practice to charge with that duty to your team. It should be done the lesser times possible, the lesser people doing it possible, and the lesser complicated to update possible.
What I am explaining you today is the possibility of configuring CheckStyle at project scope, not IDE scope, sharing the same configuration to all your team with the same commit and, even better, referencing an external file instead a local one, making updates of style immediate for every mate without even knowing.
Erase your previous configuration:
Window Menu ->Preferences -> CheckStyle. Then select your previous home-brew configuration and Remove it.
Now configure your project:
Right click over your project, Properties -> CheckStyle -> Local Check Configurations Tab -> New.
Type: Remote Configuration
Name: Whatever, yes, there's room for creativity today.
Location: URI of the CheckStyle configuration. It would be as perfect as necessary to have the file shared in a ftp server, svn server or any other easy-access way. We settled it under svn control and access it through svn+http apache mod.
Save and close.
And voila, now all your team has to do is update the project and run CheckStyle for that project, automatically the project configuration will be token and only one person had to work for a team benefit.
This is not a perfect way of doing the distribution, but it is rather better than previous, at IDE workspace files. But this configuration seems to me to much IDE-dependant either, I am searching for a better CheckStyle configuration in the Maven descriptor file. I will tell you as soon as I really see it working.
See you.
Alberto Navarro.
viernes, 7 de enero de 2011
What if... I get a "Fileset from project [projectname] has no valid check configuration" Error?
Content:
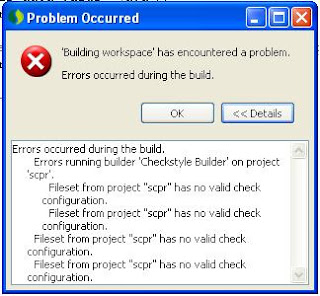
One solution for the following error:
Errors occurred during the build.
Errors running builder 'Checkstyle Builder' on project [projectname].
Fileset from project [projectname] has no valid check configuration.
Fileset from project [projectname] has no valid check configuration.
Fileset from project [projectname] has no valid check configuration.
Fileset from project [projectname] has no valid check configuration.
Analysis:
It looks like to me that you configured CheckStyle in a workspace scope (Window->Preferences->CheckStyle...). Any of your team did the same, but his/her configuration, although it is the same, he/she put a different name to the configuration.
The other person generated a checkstyle project configuration, like ignored folders, and shared it with you, through Subversion for example.
As soon as you get that configuration, Checkstyle search for a specific configuration name, your pal's one, and yours name is different. That's the error.
Solution:
Please check your .checkstyle file in the root folder of the project. Specially "fileset" node, "check-config-name" property. Its value MUST be coherent with your CheckStyle configuration name. That file must be under version control repository Subversion and is shared between developers, so it is possible that some guy imported its workspace configuration.
Example of mistaken configuration .checkstyle file:
<?xml version="1.0" encoding="UTF-8"?>
<fileset-config file-format-version="1.2.0" simple-config="true" sync-formatter="false">
<fileset name="all" enabled="true" check-config-name="Sun Checks" local="false">
<file-match-pattern match-pattern="." include-pattern="true"/>
</fileset>
<filter name="WriteProtectedFiles" enabled="true"/>
</fileset-config>
Coherent CheckStyle configuration at Window menu -> Preferences.

If the configuration doesn't defaults to the same name, or a project local configuration doesn't either, the error will appear. Check both IDE and project checkstyle configuration.
For avoiding the same error in the future, you can agree a name for that configuration with your team. A possible better solution is described here, and consist of configuring CheckStyle inside the project, and such information will travel with it, no more name mistaken will happen.
Did it work? Leave a comment.
See you! :)
| CheckStyle Eclipse plugin. Installation |
| Tunning your CheckStyle and Formatter |
| Every programmer working as only one |
| What if... I get a "Fileset from project [projectname] has no valid check configuration" Error? |
| CheckStyle configuration distribution |
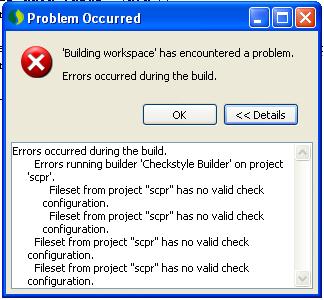
One solution for the following error:
Errors occurred during the build.
Errors running builder 'Checkstyle Builder' on project [projectname].
Fileset from project [projectname] has no valid check configuration.
Fileset from project [projectname] has no valid check configuration.
Fileset from project [projectname] has no valid check configuration.
Fileset from project [projectname] has no valid check configuration.
Analysis:
It looks like to me that you configured CheckStyle in a workspace scope (Window->Preferences->CheckStyle...). Any of your team did the same, but his/her configuration, although it is the same, he/she put a different name to the configuration.
The other person generated a checkstyle project configuration, like ignored folders, and shared it with you, through Subversion for example.
As soon as you get that configuration, Checkstyle search for a specific configuration name, your pal's one, and yours name is different. That's the error.
Solution:
Please check your .checkstyle file in the root folder of the project. Specially "fileset" node, "check-config-name" property. Its value MUST be coherent with your CheckStyle configuration name. That file must be under version control repository Subversion and is shared between developers, so it is possible that some guy imported its workspace configuration.
Example of mistaken configuration .checkstyle file:
<?xml version="1.0" encoding="UTF-8"?>
<fileset-config file-format-version="1.2.0" simple-config="true" sync-formatter="false">
<fileset name="all" enabled="true" check-config-name="Sun Checks" local="false">
<file-match-pattern match-pattern="." include-pattern="true"/>
</fileset>
<filter name="WriteProtectedFiles" enabled="true"/>
</fileset-config>
Coherent CheckStyle configuration at Window menu -> Preferences.

If the configuration doesn't defaults to the same name, or a project local configuration doesn't either, the error will appear. Check both IDE and project checkstyle configuration.
For avoiding the same error in the future, you can agree a name for that configuration with your team. A possible better solution is described here, and consist of configuring CheckStyle inside the project, and such information will travel with it, no more name mistaken will happen.
Did it work? Leave a comment.
See you! :)
martes, 28 de diciembre de 2010
Tunning your Checkstyle and Formatter
Content:
In the previous post, we installed Checkstyle and tested it a bit, a little proof-of-concept, useful for your little project at home, it doesn't cares anybody, and the world could survive without it perfectly.
Now focus on your company, it is unforgivable that every mate format their code as Sant Peter tells them. You implanted CheckStyle code in your I.T. dept. and it looks like better, but Sun style (default one for Formatter and CheckStyle) doesn't fit your interests.
One example. Your monitor is 1280 pixels wide, but Formatter defaults to 80 columns of text, and you find it miserable for your hardware, that supports much more, at least 120 columns.
Let's build this example, a comment of 143 columns length.

As soon as you invoke Formatter (Ctrl+Shift+F or Menu Source->Format), the result is next:

The comment line was broken at column 79, but I spent a large amount of money in a extreme-wide monitor and I find that length ridiculous. I better change this parameter.
Check your configuration in Window menu -> Preferences -> Java -> Code Style -> Formatter. The best you can do in this point is create your own profile, based on an existent one.
I chose New ... and type anavarro_prof, based on "Java Convention [built-in]"

Then, edit your new profile, as a sample, we will change line width...

and comment width...

Once both parameters are changed, let's suppose your project is using the IDE default formatter, so, your formatter, that have been chosen as default one after its creation.
Return to your code, re-format it! it works! it has been formatted to 120 lines width.

Did it work? not completely... see that magnifying glass that appeared at the left side of your comment...

Line is longer than 80 characters?. What's up?
This is happening because your Formatter is not directly connected with your CheckStyle plugin, so you will have to transmit your Formatter changes into your CheckStyle configuration.
Open Window Menu -> Preferences -> CheckStyle.
You should find the two built-in configurations, but you want to configure your own.

So firstly select one of them, click "Copy" to create a configuration based on an already created one.
 And change some parameters, as the type, make it external, change that ugly name and select a location where the new configuration will be created. I lend you an example:

Then, clicking "OK", your new configuration will be created and you can both "Set as Default" and "Configure". Yes, please, "Configure" it.
Search for "Maximum Line Length", and EDIT existent "Maximum Line Length" in the window on the right. Beware don't add an additional property already existent, because you won't get the desired goal.

Then change its maximum length doubleclicking it:
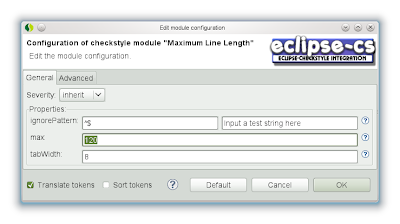
Save, Ok, Rebuild, do whatever neccesary to get your code window again, magnifying glass should dessapear after recompiling. Mine does! You have also got an external CheckStyle configurer as a xml file where you asked to. This file will be transferred to your mates in next chapter.
Quite a long article, you should have learned to customize your Formatter and make your CheckStyle configuration being Formatter-compliant. You can now impose both configurations to your entire team, in the next article, promise.
Have a happy New Year's Eve!!!
In the previous post, we installed Checkstyle and tested it a bit, a little proof-of-concept, useful for your little project at home, it doesn't cares anybody, and the world could survive without it perfectly.
Now focus on your company, it is unforgivable that every mate format their code as Sant Peter tells them. You implanted CheckStyle code in your I.T. dept. and it looks like better, but Sun style (default one for Formatter and CheckStyle) doesn't fit your interests.
One example. Your monitor is 1280 pixels wide, but Formatter defaults to 80 columns of text, and you find it miserable for your hardware, that supports much more, at least 120 columns.
Let's build this example, a comment of 143 columns length.

As soon as you invoke Formatter (Ctrl+Shift+F or Menu Source->Format), the result is next:

The comment line was broken at column 79, but I spent a large amount of money in a extreme-wide monitor and I find that length ridiculous. I better change this parameter.
Check your configuration in Window menu -> Preferences -> Java -> Code Style -> Formatter. The best you can do in this point is create your own profile, based on an existent one.
I chose New ... and type anavarro_prof, based on "Java Convention [built-in]"

Then, edit your new profile, as a sample, we will change line width...

and comment width...

Once both parameters are changed, let's suppose your project is using the IDE default formatter, so, your formatter, that have been chosen as default one after its creation.
Return to your code, re-format it! it works! it has been formatted to 120 lines width.

Did it work? not completely... see that magnifying glass that appeared at the left side of your comment...

Line is longer than 80 characters?. What's up?
This is happening because your Formatter is not directly connected with your CheckStyle plugin, so you will have to transmit your Formatter changes into your CheckStyle configuration.
Open Window Menu -> Preferences -> CheckStyle.
You should find the two built-in configurations, but you want to configure your own.
So firstly select one of them, click "Copy" to create a configuration based on an already created one.


Then, clicking "OK", your new configuration will be created and you can both "Set as Default" and "Configure". Yes, please, "Configure" it.
Search for "Maximum Line Length", and EDIT existent "Maximum Line Length" in the window on the right. Beware don't add an additional property already existent, because you won't get the desired goal.

Then change its maximum length doubleclicking it:

Save, Ok, Rebuild, do whatever neccesary to get your code window again, magnifying glass should dessapear after recompiling. Mine does! You have also got an external CheckStyle configurer as a xml file where you asked to. This file will be transferred to your mates in next chapter.
Quite a long article, you should have learned to customize your Formatter and make your CheckStyle configuration being Formatter-compliant. You can now impose both configurations to your entire team, in the next article, promise.
Have a happy New Year's Eve!!!
Suscribirse a:
Entradas (Atom)